THIS BLOG HAS MOVED. PLEASE UPDATE ANY BOOKMARKS TO GO DIRECTLY TO WWW.RAISINGGEEKS.COM

Thursday, March 31, 2011

Washington DC - Day 1 - Wednesday

The boys & I  are on a Washington D.C. adventure... I'll post more later, but here are some pics from our very COLD and WET first day :)

Why yes, I do have enough cable to build this in my parts bin. They boys thought this thing was REALLY cool...

Woah....

Just for fun...

"It was bigger than I thought!"


The boys really liked the Gettysburg Address on the wall of the Lincoln Memorial


Yes, there was a discussion of Einstein's theory of relativity among the three of them...

Monday, March 28, 2011

March 27th: Project TLC

Project TLC = Temperature Logging and Control

Well, technically Date, Time, Temperature, and Humidity Display and Logging to USB Flash Drive with Serial Control of a Z-Wave Thermostat to Keep My Wife in Her Perfect Temperature Zone at Night - but "Project DTTHDLUFDSCZWTKMWHPTZN" is a little harder to remember :)


Parts: Arduino Duemilanove, Web4Robot Serial LCD, Macetech Chronodot, TMP102 on sparkfun breakout, HH100D humidity sensor, VDIP2 USB Flash Drive interface, MAX232 to a VRC0P Z-wave serial adapter...

Goal is to monitor / log the temperature in our bedroom overnight and to adjust the thermostat setpoint (via Z-wave) as needed to keep Candy from waking up warm :)

I need to add a big "I'm Warm" button that will cool the room another few degrees, and some interface buttons for time / date set, etc.

Code is working for date / time + temp / humidity + logging. Next up is integrating the Z-wave proof-of-concept code.

Yes, this is massive overkill, but I wanted to learn each of the components, and I had most of these parts in the parts bin...


Learning:
1) When learning a new device (VDIP2) update the firmware FIRST! Turns out certain functions (setting date / time of a file) only work in the newer firmware. (Lots about 2 hours on that one...)


2) The HH100D only needs I2C once - not once at powerup - ONCE. You read the 2 calibration values, then store them as constants in your code. I also wrote them on the PCB with a sharpie :)


3) Learn each new device with a small stand-alone test program and then integrate it. I know this, but seem to always want to jump straight to adding a new device to lots of existing code. 


4) The Web4Robot serial LCD is very nice. When I purchased them, I wanted the I2C capability and key matrix functions - I didn't use them here, but its a great little serial display to add to any circuit for debugging.


5) The Chronodot seemed like it wouldn't be usable on this size breadboard - until I realized that I only need the pins on one side of the dot. Moved it over a bit and it fits.


6) The VDIP + the flash drive are very touchy - it doesn't always see it and moving the flash drive a bit causes it to work. Not good in a production device. I'll need to try some other flash drives and the other VDIP that I have to see if it makes a difference.


7) RTCs (like the Chronodot) have a built-in temp sensor for calibration. It might allow me to ditch the TMP102 and simplify the final circuit. 


UPDATE: This messy breadboard contraption lived in our bedroom overnight - I did some basic masking of LEDs and threw socks over the LCD. Laying in bed I realized that this thing can really be simplified. If I read the configuration off the USB stick, I don't need the LCD or buttons for setup. (Its really handy during the debug stage, so I'm thinking i'll just put a nice switch on it for now...) 


After logging overnight, it appears our bedroom stays within 1 degree all night (at least last night)...which makes me think this isn't a temperature sensing issue (thermostat in the wrong place) or an airflow issue (causing temperature swings)...I may just need to drop the setpoint more during the middle of the night when she gets warm...but at least this way I'm verifying it isn't an A/C design issue.


More data can only help...and I have a nice little temp / humidity logger now - even if I don't spend lots of time trying to change the temp via serial -> z-wave :)


WideTracking!


Once we get the Firebird running again, we will have to go "WideTracking!"


Sunday, March 13, 2011

March 12th: It was a good day as a GeekDad

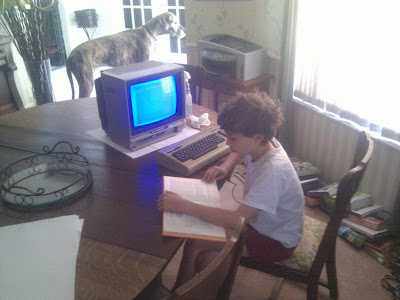
I told myself I'd let my kids exercise their sense of freewill when it came to choosing their hobbies / interests. I try to take what they are interested in and make it easier for them to learn. If they didn't show interest, I didn't push it - but I was a little disappointed that my 10 (almost 11 year old) has not wanted to learn about programming. Until yesterday :)

Yesterday morning, I'm sitting at my laptop, trying to wake up, reading the latest on #reprap when he asks me "how do you learn to program a computer?" I wanted to yell, "OOH, OOH PICK ME, I CAN HELP!", but instead I handed him the two books that have been waiting for him. They were given to me at about the same age and they cover good ol' 8-bit computers and BASIC.

Now, perhaps I'm too nostalgic (or just repeating my learning steps) and should start him with C or HTML or any one of the dozens of mainstream options, but starting with BASIC has always seemed "right".

There is a great article from 2005 that explains my sentiment called "Why Johnny Can't Code" in that article, the author explains that BASIC was ubiquitous - as you were given a computer back in the day, you were also given a manual for BASIC. Learning to code in basic was like learning how to use a web browser today - expected as part of the experience.

I've had more than those books waiting for him...I pulled out the C64 yesterday, along with the Commodore monitor and the 1541. He was excited. "I like the way the keyboard sounds dad..." - I wanted to cry little tears of pride :)


He started reading the book immediately and spent an hour calling me in to show his PRINT statements. Next thing I know, he's doing math and INPUT. We would take his programs and I would add one more concept, then let him change it again from there.

About midnight, I found myself in the attic, pulling out the C64 Programmers Reference guide. (I have two - and knew exactly where they were...sad, huh?)

Oh, the memories...

When I was 12 or 13, I knew this book inside and out. I remember at that time thinking that the only thing I didn't really understand was the machine language section and the schematic included in the back of the book. Turns out that a computer science degree helped - that stuff makes sense now.


Today, I'm just going to let him find his own way with the C64 and the books - back to that freewill - and see what happens.

Saturday, March 12, 2011

Lasersaur is cutting!

The Lasersaur open-source hardware project hit a MAJOR milestone - they are cutting. This video shows CLEAN cuts on 6mm acrylic. I can't wait to see these built & then evolved reprap / arduino style...

For more info see - http://labs.nortd.com/lasersaur/

Sunday, March 06, 2011

March 6th: 3D Printing Software

There is soooo much to learn as part of the 3D printing adventure.

I wasn't feeling great yesterday, so it was a good day to park myself in front of the computer and learn new software. I really want to be ready to go when the Prusa Mendel kit gets here...

The first piece of software I learned yesterday was OpenSCAD - the Programmer's Solid 3D CAD Modeller. Sounds perfect for me - I can't draw or sketch, but I can code (well, better than I can draw or sketch). There are many other options like Google SketchUp, Blender, etc. - but I really liked the idea of using code to generate the objects. I suspect SketchUp and OpenSCAD will be my tools of choice - If I have something crazy complex, I've got some friends that can use blender, solidworks, etc.

The below OpenSCAD code generated the 3D object on the right. This type of design is called Curve Stitching - you make curves from only straight lines. While it took me some time, you can see that it is very minimal code. If OpenSCAD supported variables inside loops, I would have been done MUCH quicker. Yes, I had to use GEOMETRY  :) I've always used this design as my "HelloWorld" anytime I learn a new graphics library - I've done it on 8-bit devices, DOS low-level graphics, Widows primitives, Java, and even the graphing TI Calculators :)

OpenSCAD uses .scad files which are the code, and you can output into a number of formats, including STL which seems to be the file format of choice for 3D printing software.


Once I had the .stl file for my "thing", I hopped over to thingiverse and created an account. Thingiverse is a site for sharing 3D models destined for 3D printing. There is some AMAZINGLY cool stuff on the site, check out the "Popular Things" feed to see some of them. What is awesome is that people share the source files used to create the things, so that you can take and modify them however you like.

Here's my "thing" uploaded to thingiverse - I uploaded both the .scad file and the resultant .stl file. This way, someone who wanted to just print it could use the .stl, but someone who wants to modify the design or see how it is created can use the .scad - I love it.


Once you have a .stl file, you need to convert the model into GCode. GCode are the raw instructions like "turn on the heated print bed", "set the extrusion temperature to 90* Celsius", move to this position, extrude, move to this position, etc. There are several software options for this, two of them are skeinforge and repsnapper. 

Here are some screenshots of both:

Skeinforge is python-based, so you see a python console window:


This is the main skeinforge settings & control window:


After converting to GCode, you get two visualization windows, SkeinLayer and SkeinISO. SkeinLayer lets you see how each later will get built and you can choose to animate to watch the build process.


This is what the final GCode output looks like...Skeinforge does not transmit the code to your printer, but there are other utilities for that...


Repsnapper is an all-in-one stl to gcode compiler, includes the visualizations in frame and can connect & transmit the GCode to the printer. It doesn't appear to have the raw configuration detail of skeinforge, but looks promising.


In the end, I can imagine that each software package has its own strengths & weaknesses. There are others like replicatorG (from Makerbot?) and the reprap java apps that I haven't looked at yet. As I mentioned before, this space is progressing at an amazing rate of change, so I'm sure that progress will be rapid. Just keeping up may be the hard part...

March 5th: The 3D Printer Adventure Begins!

I've ordered the 3D Printer kit...now the adventure begins.

I chose the MakerGear Prusa Mendel kit. When it is assembled, it looks like this (top view):


But it starts with lots of parts like this:


Sure looks like fun, doesn't it? :)

By now, you should know that I overanalyze everything - so you are probably wondering - why THIS design / kit / vendor - especially when I previously wanted to order a Makerbot or an Ultimaker?

After a ton of reading and some examination of my goals, I realized that I wanted to learn each and every part of the design. Sticking with a reprap design (in this case a derivative of the reprap Mendel) means that while it doesn't look as good (no fancy laser-cut case, etc.) - I'd learn the basics without vendor-specific limitations. At the same time, I liked the idea of single-sourcing the components, knowing that they were designed to work properly together and I'd have everything I need. Nothing worse that blocking a weekend, getting everyone over to build and realizing a part is missing or incompatible. I read good things about MakerGear as a supplier, and spent some time on their IRC channel (where I ran into someone I knew from the Arduino world...). I ordered the full Prusa Mendel kit, including an extra extruder "hot end" so that I can use both 1.75mm and 3mm "filament" - filament is the spool of plastic that gets melted and extruded to form the finished part.

I also figured that the rate of change in this area is crazy right now, so if I really get into 3D printing, there will always be some fancier model (Ultimaker?!) that can be purchased later.

I'm hoping it will arrive in late March, and will scheduled the build days in April. If you are interested in participating, just let me know!